Working with AVCHD in Windows Movie Maker
I'd have to say that I was a little disappointed when I found that my new JVC GZ-HD310 recorded our precious memories in a format that is compatible with stuff all software. Its my own fault really, I got over excited and should've done more research. After a few days of playing around I've found a good (but less than ideal) work around.
Here's the short version:
1. Use Free HD Converter to convert the files to wmv
2. Add those wmv files into Windows Move Maker and edit and export like you would with a "normal" camcorder.
The reason I say this is less than ideal is because it involves converting the video files twice. Like any media, everytime you convert/re-encode you lose quality. for me, I'm not too concerned. The reason I got an HD camcorder was a way of future-proofing, I don't have an HD TV yet so don't really get the benefit yet.
Here's the longer version of the process I now use. I'm writing this based on my JVC GZ-HD310, but most of the process will apply to any HD camcorder that uses AVCHD.
1. Install Free HD Converter. Visit http://www.koyotesoft.com/indexEn.html and download Free HD Converter, version 1.2 at the moment. The installation is pretty straight forward - next, unselect all the toolbars, next, finished. If you can't handle this step on your own - this process is going to be too hard, you should consider returning your camcorder to the store.
2. Connect your camcorder to your PC. For my JVC this means connecting the camcorder using the USB cable, turning the camera on and selecting "Playback On PC". "Export to PC" will also work, I believe the only difference is what the JVC software does - I don't use the JVC software.
I also remove the battery from the camcorder and connect the external power. This is so I don't have to worry about the battery dying during the conversion - which will take a few hours. I also disconnect the battery to try to maximize its life and not waste recharge cycles when I'm going to be sitting next to a power outlet anyway.
3. Select the AVCHD (.MTS) files. When I connect my camcorder it installs as an external hard drive so I access the files by going to H:\AVCHD\BDMV\STREAM. It may not be H: for you, but the principle should be the same. On non-JVC camcorders this process may be different - I cannot help you here, the manual may.
Open the path to the MTS files in Windows Explorer. Select the files you want and drag them onto the In Free HD Converter window. You can also go to File->"Add MTS/M2TS File" the option is yours. The application can appear to hang during this process, be patient, it'll get there.
4. Select encoding options. Free HD Converter has a few presets built in. For me the WMV HD option is perfect, if you have specific requirement or want to preserve the 1080p/i quality you can tweak the options in the bottom right:
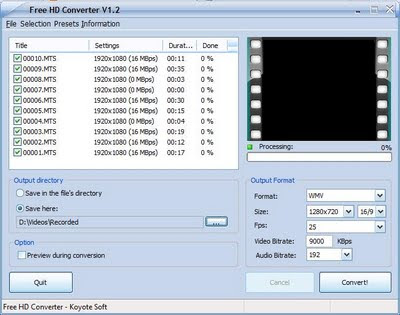
I also change the Output directory - this is just a personal preference with how I organise my computer. Do what you like here, just make sure you know where the files are going.
5. Convert. When you're happy with the options you've selected click convert and go get yourself a coffee, you'll be waiting a while. My first test had just over an hour of recording and the conversion took just over 4 hours. This will depend on your PC specs and the footage you have but you'll definitely have time for a coffee or two.
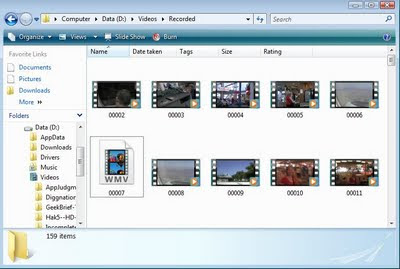
When the conversion is done you'll have a folder of WMV files (depending on the options you selected of course):
You can now fire up Windows Movie Maker and work with the files you've created. there are plenty of guide out there on this process so I'll leave you to use those from this point. Microsoft has actually put together some good resources here for begineers: http://www.microsoft.com/windowsxp/using/moviemaker/getstarted/default.mspx
Obviously, if you don't want to use Windows Movie Maker these files you've made will work with most (if not all) other movie editing programs. Lets be honest, Windows Movie Maker is a long way from being the best but it does have free working for it.

Here's the short version:
1. Use Free HD Converter to convert the files to wmv
2. Add those wmv files into Windows Move Maker and edit and export like you would with a "normal" camcorder.
The reason I say this is less than ideal is because it involves converting the video files twice. Like any media, everytime you convert/re-encode you lose quality. for me, I'm not too concerned. The reason I got an HD camcorder was a way of future-proofing, I don't have an HD TV yet so don't really get the benefit yet.
Here's the longer version of the process I now use. I'm writing this based on my JVC GZ-HD310, but most of the process will apply to any HD camcorder that uses AVCHD.
1. Install Free HD Converter. Visit http://www.koyotesoft.com/indexEn.html and download Free HD Converter, version 1.2 at the moment. The installation is pretty straight forward - next, unselect all the toolbars, next, finished. If you can't handle this step on your own - this process is going to be too hard, you should consider returning your camcorder to the store.
2. Connect your camcorder to your PC. For my JVC this means connecting the camcorder using the USB cable, turning the camera on and selecting "Playback On PC". "Export to PC" will also work, I believe the only difference is what the JVC software does - I don't use the JVC software.
I also remove the battery from the camcorder and connect the external power. This is so I don't have to worry about the battery dying during the conversion - which will take a few hours. I also disconnect the battery to try to maximize its life and not waste recharge cycles when I'm going to be sitting next to a power outlet anyway.
3. Select the AVCHD (.MTS) files. When I connect my camcorder it installs as an external hard drive so I access the files by going to H:\AVCHD\BDMV\STREAM. It may not be H: for you, but the principle should be the same. On non-JVC camcorders this process may be different - I cannot help you here, the manual may.
Open the path to the MTS files in Windows Explorer. Select the files you want and drag them onto the In Free HD Converter window. You can also go to File->"Add MTS/M2TS File" the option is yours. The application can appear to hang during this process, be patient, it'll get there.
4. Select encoding options. Free HD Converter has a few presets built in. For me the WMV HD option is perfect, if you have specific requirement or want to preserve the 1080p/i quality you can tweak the options in the bottom right:

I also change the Output directory - this is just a personal preference with how I organise my computer. Do what you like here, just make sure you know where the files are going.
5. Convert. When you're happy with the options you've selected click convert and go get yourself a coffee, you'll be waiting a while. My first test had just over an hour of recording and the conversion took just over 4 hours. This will depend on your PC specs and the footage you have but you'll definitely have time for a coffee or two.
When the conversion is done you'll have a folder of WMV files (depending on the options you selected of course):

You can now fire up Windows Movie Maker and work with the files you've created. there are plenty of guide out there on this process so I'll leave you to use those from this point. Microsoft has actually put together some good resources here for begineers: http://www.microsoft.com/windowsxp/using/moviemaker/getstarted/default.mspx
Obviously, if you don't want to use Windows Movie Maker these files you've made will work with most (if not all) other movie editing programs. Lets be honest, Windows Movie Maker is a long way from being the best but it does have free working for it.

Comments